Wednesday, June 15, 2022

Siding

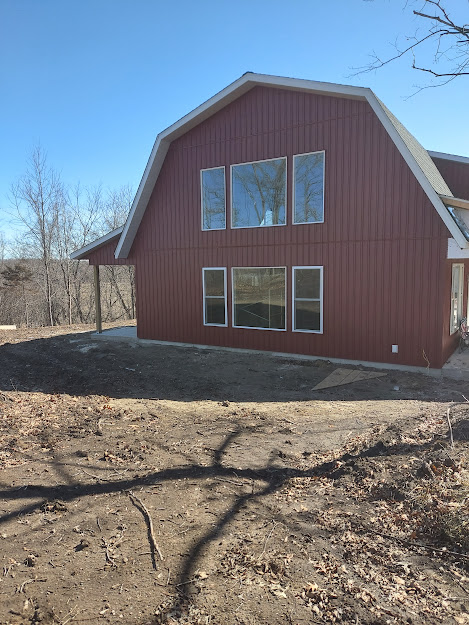
During the same time frame that we were doing the floors, Troy was working on the siding. We went with a vertical board and batten style of vinyl. The brand is Certainteed, and I was impressed with the quality of it compared to the stuff used on the Buffalo house. It's twice as thick, and therefore should not be so likely to crack when hit by a foreign object. I've waited to make a post because we couldn't get a nice picture of the front of the house with a dumpster in the way. 

Troy started with the backside. We were at the time of year when things were starting to warm up, and he wanted to do the areas over mud before it thawed. The parts over gravel would be much easier to deal with than mud after thawing. 


From there he went to the back side of the shop, then the front of the shop, and eventually to the front of the house. 


Ugh! All the mud! EVERYTHING is muddy when the frost comes up. 


House, but with a forklift and trailer in the way. 


Another story of Brock the Fearless: He was MIA for a week, and when asked, Troy told us that he had a broken wrist. He and a cousin had been tearing out a wall and the cousin challenged him to punch through the drywall. As any 17yo boy would, he took the challenge, and hit a stud instead of just drywall. After it was determined that he did not require surgery, he was back at work with a cast on. Using the forklift with its work platform, he was working on the side of the upstairs dormer. They have brackets that hook to the roof under the shingles to hold boards to create a support platform. Brock was on top of that platform when a bracket broke loose. He slid down and off the roof, and managed to grab the forklift platform on the way down. With the broken hand. Dustin quickly helped him down from there. A few days later he was back at work. This time he had been told that he DID need surgery, but not for function, just to prevent a weird lump in his wrist. He opted to not have the surgery. Boys and their battle scars!


FINALLY! A full front picture with no dumpsters or forklifts in front of it. 


Bathroom Vanities

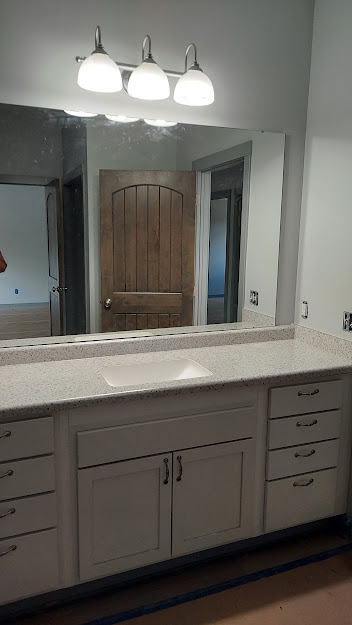
 One of the design/budget choices I made was to use dressers for the bathroom vanities. Buying new vanities would be about $1000 for each bathroom, an expense I knew I could do better than. For months last year I stalked online sources for appropriately sized dressers. They had to be the right length, and had to have a design that would allow for the plumbing in the middle. I eventually found one for the upstairs bathroom for $150.


I would have liked to refinish it to match the rest of the woodwork, but various logistics made that impossible, so it will have to be done later, if it ever is. I did, however, sand the top and reseal it with a marine-grade varnish. The sanding did a nice job of highlighting the grain, and now I want even more to re-do the whole thing. 

This dresser was the perfect length according to the numbers, but when we went to put it in place, it was about 1/4" too long, so Sid had to trim the tiniest strip off each end. Also, the trim around the doors was in the way, so we had to have Troy remove the trim for us. It was about 3" taller than a kitchen cabinet, so it had to be shortened. I like the kitchen height rather than a typical bathroom height because we are tall people. To shorten it, I removed the front and side trims, cut 3" off the bottom edges, cut 1" off the trim pieces, and reattached them. 


For the sink, we bought one that is intended to go on top of a small vanity. I like the sink integrated into the countertop so there are no edges to get gunky. A hole cut into the top, and the sink dropped in. Some adhesive underneath, and clear sealant around the edge.


The dresser came with a mirror, but it's frame was intended to sit on top of the dresser, which did not work with the sink, and I thought it looked too bedroomy, so I took the mirror from the frame and mounted it on the wall instead. 


In the downstairs bathroom, Sid did not like the idea of a dresser, and I was having a horrible time finding one long enough that did not look downright UGLY. Dressers of that length were a 70s style, and the furniture designs from that time were awful. At one point I bought 2 kitchen drawer cabinets to use, planning for Sid to build a central section with doors between them, but we learned that as well as being shorter, bathroom cabinets are also less deep, and the kitchen size ones would not fit between the back wall and the adjoining doorways. These cabinets will end up in my sewing room instead. 


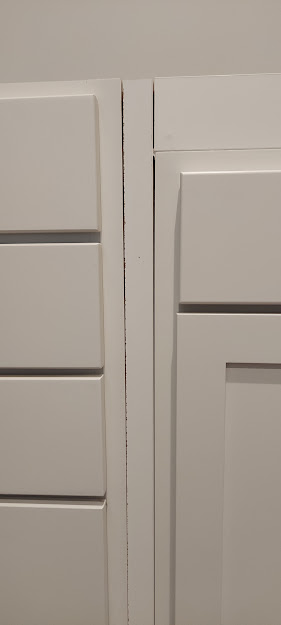
We then decided to take a day to check out the various salvage and clearance outlets in the city to find something that would work. Our first stop was Building Materials Outlet in Eagan. A friend had told me about this place, but I had not yet been there. It was a gold mine! If we had been building this house ourselves from scratch instead of using a GC and his suppliers, we could have saved a LOT of money shopping here! In the end, we came away with 2 drawer cabinets, and one with double doors, total of only $320. They are the same brand and same finish, but the drawers are kitchen-height, and the door cabinet is bathroom-height. All the same bathroom depth though. I knew we would need some filler strips to complete the fit, and tried to track some down from the manufacturer so the color would match (It's amazing how many different shades of white exist!) but could not find a local dealer or one that would ship them to me. I ended up ordering white filler strips from Menards, but the color does not quite match. While Sid was messing with kitchen cabinets,  I put these together. A little math to make the strips fill the right spaces, a little caulk to fill the cracks, and the same handles as the kitchen cabinets.


The countertop for this cabinet DID arrive in just a week. It's only formica, but it has the integrated sink I want. The mirror came from one of the salvage dealers. I priced large mirrors online, and they go for about $1000, IF you can even find a place to order from, as they are not currently in style, but we got this one for $50! 


All in all, I'm VERY happy with the outcomes in both bathrooms. 


Kitchen

 Wow! Three months since the last post! Mostly due to the kitchen install, which, like the flooring, dragged out unexpectedly long. 

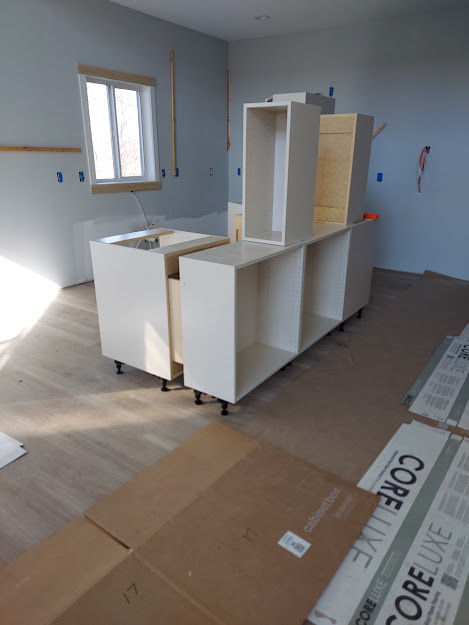
We opted to order our kitchen from Menards, as there are features to their cabinet line that I really like. They are "European style" cabinets, which means they have no face frame on the front, allowing full-width access to the interior and wider drawers. They are also modular; you can choose to swap out doors for drawers, or different size drawers, etc. 

I chose almost entirely drawers for the lower cabinets. They are easier to get stuff in and out of, and allow for full access w/o having to get down on knees on the floor. The only lower doors are the corner carousel, the ones under the seating overhang, and the pantry cabinet. 

When we picked up the order at Menards, they loaded it all very quickly. It was not possible to track the items against the order sheet to be sure that we had everything. The staff assured me that the order was triple-checked as it went through the process, so I gave up and took their word for it. Once we got to the house, they all got piled in the dining room. Per the advice Sid found online, Wanda and I attempted to sort all the pieces and parts according to the respective cabinet, partly to double-check the order, partly to organize it for assembly. Good in theory, but in the long run, it really didn't help.


Cabinet install begins with the corner. Super easy right? Just attach it to the two walls. But it didn't fit square. The corner seemed to be obtuse, making the cabinet only reach the wall on one side. Sid and Tim fussed with it for 2 days, trying a few different options, and putting up/taking down several cabinets in attempts to make it work, at one point taking a mental break and putting the island together instead, so they could use it as a work surface. Finally they took it all out again and called on Troy. He checked the walls for square and flush, and found a bowed-out stud was causing the problem. He picked up his circular saw, carved out a hollow on the back of the cabinet wall, and fit it into place. Sid and Tim were able to take it from there. 


While Sid and Tim worked on the cabinets, John, Matty, and I worked on putting drawers together. When you choose all drawers for the lower cabinets, that's a LOT of drawers! 


When the cabinets were finally completed, we had to fit the countertop templates. A little tweaking was required, so we had to go back to Menards to make some adjustments. They told us one week is the usual turn-around. When I recieved the confirmation e-mail, it said *3* weeks until the expected shipping date! Three weeks came and went. At 4 weeks, I found a place to check the status online, where it said "partial" delivery had been made to the store. 

When we needed to go to Menards for other things a few days later, I checked in with the pick-up desk to see which parts had arrived. All progress on the house was stalled until we got those countertops in, and I was hoping for the 2 side pieces so we could at least move forward on other aspects of the house while we waited for the rest. But, the only thing in was the island top- the least needed piece. The staff was confused because "they NEVER send partial orders of countertops". The Pick-up staff walked me over to the cabinet dept. because they have the ability to connect to the manufacturer and find out more detail. The guy there, Peter, looked it up and found the rest was on the truck due in at noon that day. Yay! He promised to keep me posted and let me know when it arrived. At 1:00 I got a call  from him. The truck had been pulled over in Wisc. due to something dripping from the cargo. Per the cops, they were not allowed to continue. Per company policy, they were not allowed to break the seal on the truck w/o permission. So, they had to square things with their superiors, and probably get another truck to meet them to transfer the cargo. I don't know what all happened at their end, but we didn't get our countertops until 3 days later. 


While the island top was very nicely packaged, the other pieces were less so. Maybe it was a result of the extra handling in the truck issue, but the corner of the miter was cracked. The top surface was only bent, so we opted to attempt a repair rather than have to wait ANOTHER 4 weeks for a replacement. It got glue in the crack, and flat pieces clamped on both sides to hold it flat. It worked, but it still wanted to curve upwards. 


Installing the tops into the corner required removing the side of the fridge space, and shaping the back edge to accommodate that bowed wall near the corner. I ordered the top w/o a backsplash because it would have complicated the pass-through and because I am going to do tile. We also realized after the fact that it would have been an issue with the window trim, so I'm glad I made the choice I did. 


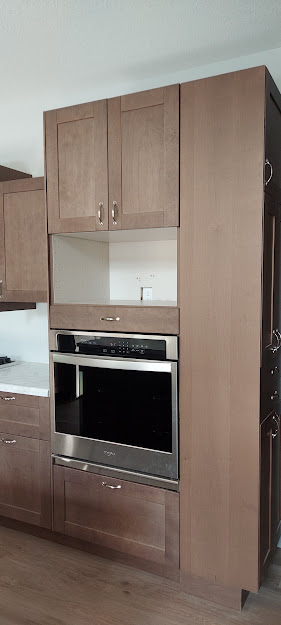
NOW we can finally get the plumbers in to install sinks, and the electrician in to do the oven, along with all the other things that are in their respective purviews. The oven as you see it in the pic above is just set into it's opening. We had to use it to get its shelf into the right position in relation to the drawer underneath. The shelves and drawer above it are just stuck up there out of the way, w/o concern for their final position. Not knowing what goes into the installation, and knowing the electrician needs clear access, we left that part until later, to work around whatever the electrician does. 

After the electrician came to do the wiring, he let me know that the oven does not fit! The cabinet is not deep enough, and we need to add some strips of wood along the front edge so it can be anchored. He  put in the wiring, but because of lack of space behind, he had pulled the junction box up into the space above the shelf and drilled holes in the shelf to pull the wires through (the shelf that was not intended to stay in that location.) Another hold-up while we get this figured out. We found a few scraps of cabinet material to use as build-up strips that would keep it all matching. It made NO sense to me that a cabinet sold as an oven cabinet would not allow the oven to fit, so I pulled out the assembly instructions to see what I had missed. The instructions take you through all the steps, including how to put on the back pieces, with no mention of special accommodations for an oven. Instructions appeared to end at the bottom of the last inside page. Then I turned the booklet over. On the very back outside page, it adds, almost as an afterthought, that if you are installing an oven, leave off the backing in that area! Well, at least that's an easy fix. It had been glued and nailed into place, but the precision use of the appropriate saw removed it easily. We had to make some modifications to make the drawer and shelf fit around the junction box, but in the end it all fit properly and functionally. There is now a mess at the back of the microwave shelf, but we have matching contact paper, so I'll make a false back to hide it all. 

It took MUCH longer than anticipated, but the kitchen is now DONE. All appliances are in place and functional. A couple small finishing details needed, but if I wanted to I could cook a meal here. 


Tuesday, March 22, 2022

Doors

 There's not a lot to say about doors. They are usually an open-and-shut subject.

Rather than the usual 6-panel style, we chose a country plank style. They are pretty doors, knotty alder, and being solid instead of hollow-core they are good for sound reduction. They will be stained to match the kitchen cabinets. Hopefully. I realize a single stain can vary greatly according to the type of wood, and so many woods tend toward a red or yellow undertone. 

Here's a basic door.


We also have a pocket door to the bathroom.


Barn doors for the mud room closet and the master closet.


A Dutch door to the mud room, which will do the job of a doggy gate when needed. 


And my favorite, double-swing doors for the pantry and laundry room. 


I was surprised by the arrangement of the hinges. Troy was too, but said it provides the support needed to keep the door from sagging given the strength of the springs; there was noticeable sag with only one hinge up there. One of these hinges squeaks loudly! We teased about it being prevention against midnight pantry raids, but Troy said he's already ordered a replacement. 

These are my favorite because they solve an issue that has annoyed me for 21yrs in this house. Currently my route to the laundry room in the basement requires me to pass through 2 doors that compete for swing space. Opening one blocks the other, leaving either open hinders our path through the family room, and being on the stairways, they are usually closed to help with temperature control. Every trip to and from the laundry requires dealing with doorknobs when my hands are full of a basket of clothes. When I was little, we lived in one house that had a swinging door on the kitchen, and I have always thought that was so practical! 

Monday, March 21, 2022

Floors

 Floors were a long haul, and deserve a post of their own. This is one of the projects we opted to DIY. When Troy sent us to the local flooring store to pick out a floor, the prices were !!!! compared to what I had seen elsewhere. I did some shopping around and we opted to do this on our own. Luxury vinyl plank, or LVP, is commonly sold as a DIY product, so how hard can it be? 

I finally settled on Lumber Liquidators as the source, and chose several I liked to order samples. The goal was one with blended colors that would work with both the kitchen cabinets and the grey paint. Finding something to match both grey and brown, and NOT have orange, yellow or red undertones, meant getting one of the newer looks instead of something more traditional and monotone. 

We eventually settled on one we both liked., but couldn't order it yet as there was no where to put it that wouldn't be in Troy's way. It went on sale, then sold out. When it was finally time to order, I had to pick from other options. I went up to the store, and spent much time comparing. One I liked was glue-down instead of floating- Nope. Another was low-grade and wouldn't stand up to puppy-dog nails. Eventually narrowed it down to 2. First looked too stripy, other looked blotchy. Stripy won. It took several weeks to come in, and the saga of picking it up is in the previous post. 

It sat in the garage for a couple weeks, then got moved into the house to acclimate for a few days. The boys and Matty helped Sid carry it in and the kids carried the necessary amount upstairs. 

Troy told us that they had done all the floors in his new house in 10 hrs. That sounded promising! How hard could it be?

When Sid started laying it, he started on the long west wall with the big windows. We found that the big issue with a floating floor is keeping in stable! It must be laid with a gap all around, not tight against the walls/framing. This means it wants to move when you push hard enough to make it click together. Since it is laid by the row, with the ends connected first, it's really unstable at the beginning. It took Sid a whole day to lay the first 5 rows. 


The second day he had to start off with a couple obstacles. First up was the septic clean-out in the corner. The flooring had to be done as a removeable cover for future access. Next up was the first in-floor outlet. Those required a cut close around the pipe. Sid completed about 3X what he did the first day, and we got a good rhythm going working together. 


By this time we were seriously doubting Troy's claim. Just how many people did he have working?  How much was carpet instead of floors? 

The third day, Bill was available to help and he and I worked on the mud room. This is a different type of tile. Still vinyl and click-together, but it looks like a large ceramic tile instead of a wood. This pic looks like a nice square room, but it has a large closet and several changes in width along the west wall. We got most of it done in less than a day, and I finished up the rest the next morning. From there I moved to the downstairs bathroom. Small and square, but with a pipe to make it interesting. 


The next day, Bill was back, with Wanda. We headed upstairs and started on the underlayment. The downstairs got a foam underlay with a vapor barrier. Upstairs it's a felt for noise reduction. It was a nuisance to lay as it was rolled backwards so we couldn't just set it down and push to unroll. Tim and Matty showed up and started on the bedroom until Sid commandeered their assistance downstairs. Underlay was all we got done that day. 


On my own the following day, I did the upstairs bathroom. I goofed and didn't stagger the boards. Didn't notice that until after I cut the holes for the pipes, and there wasn't any more tile so like that it will stay.  


Then came the plank for the rest of the upstairs. The long wall was just as long as downstairs, with the addition of heat vents to make it even less stable. We tried starting it right up against the framing, but there were multiple nails that prevented complete contact. Final solution was many small pieces of tile placed between the nails and bridging every joint between tiles. We completed about 5 rows, then removed the spacers and push the whole thing gently into position. Then we quit for the night. The next day I got it done as far as the stairway. 


Another day had that room done, then I moved into the guest room. Got it all done, and when I reached the far wall discovered the whole thing was cockeyed by about a half inch, thanks to the trouble I had making the corner into the closet. I couldn't move the whole thing, so I took it apart down to 3 rows and shifted the remainder into place. I braced the edge to prevent movement and got it relaid in an hour. Amazing how much faster it goes when the boards are already cut to size. Sid needed the crowbar that was bracing it, and since it was nearly done I gave it to him and finished the floor. And it was crooked again. Sid came up to evaluate it and found the initial board in the closet needed to be trimmed narrower. Took it apart again. Trimmed the offending board and laid the room for the third time. Success! 


Continued down the row of rooms to the dressing room and the library with no problems. 


While I was working upstairs Sid was continuing downstairs, many days only getting a few rows done after work. Through the days he learned a few tricks than made for faster progress. Through the kitchen, study, hall, and all the little spaces. Lots of precision cuts and corners and back-tracking into the rooms. Finally to the bedroom and job completed 4 weeks after beginning. 


At some point we teased Troy with our doubts re: the speed for his house. No carpet there, but he did have the help of Brock and Dustin. A well-tuned team that knows all the tricks can certainly out-perform a couple amateur's who are learning as they go!

Wednesday, February 16, 2022

Many things

Lots of items to update. None of them worth a whole post individually, but now it's time to update before the next big thing happens. 

1. This is our house withOUT a drill truck in the back yard! It sat there for a MONTH. I'm sure the drillers were just as frustrated as we were, probably more. Whatever was broken finally got fixed and we finally have a well. It's 230ft deep which was almost double what we expected based on neighbor's wells, but at least we have water. 


2. Drywall went in. This crew gets status as the one we've been least pleased with so far. End result is great, but every time we went in their non-working habits teed me off. Spilled food that sat for days. Orange peels scattered all over the floor. Pop spilled and soaked into the subfloor of the shop attic in several places. I know it's just a construction site to them, but to me it's my new home, and I would NEVER treat someone's new home like that. Sid found a couple places where they missed cutting the opening for electrical outlets, and I noticed just today, a month later, that they didn't cut out the opening for the ceiling light in the laundry room. 


Drywall was followed by tape and mud, which spruces up the appearance considerably. A VERY dusty and sloppy process!


3.Garage doors installed! New openers set up, completely programmed for us. Unfortunately not fully functional yet as there are no outlets installed yet and they must temporarily be plugged in with an extension cord to the one usable outlet in the garage. 


4. Last fall, when the process was getting into full swing, we realized the trailer could not stay on the hilltop because it would be in the way no matter where we put it. Couldn't stay in our driveway at the house either. So it stayed in it's summer spot under the trees by the garden. When I ordered the flooring, we knew the trailer would be needed to pick it up, so Operation Trailer Dig-Out was commenced. The back driveway gets a considerable amount of drifting in the lower spots, and the driveway is 1/10th mile long to the garden. So this entailed loading the snow blower into my truck, and hauling it out. Sid started at the driveway and blew his way all the way across the creek to the garden side then headed down the back driveway. It was pretty easy going for much of it, but the area nearer the road was so packed in that it required me to break it up with a shovel before the snow blower could deal with it.
 

5. I decided to try out the driveway on the back side of our hill as a sledding hill. The sled refused to make the curve and instead insisted on heading straight toward the trees and ditch. Banking the curve is required for future fun. I tried to do that on this day, but the snow was too dry and fluffy to pack  and the sled went right through the piles I attempted to build. I've been told that hay bales will help a lot.


6. Flooring was picked up just last week. That was a whole adventure of its own! Horrid day for pulling a trailer with high winds and icy roads. The alley behind Lumber Liquidators is narrow, and mostly occupied by tractor-trailers for the neighboring business. Sid had to figure out how to turn the Suburban-with-trailer around while it was empty so we could make an easy escape after it was filled. Three and a half pallets of flooring later, the sales guy noticed that the tires were looking a little flat. (Tires filled in summer get considerably flatter in mid-winter temps) We checked the pressure and they had enough to at least make it to a gas station. St. Cloud traffic is always horrible, winter streets are always hiding potholes, and with a full trailer to pull, both of these make the job dicier. We found a gas station just around the corner and a block up, but it's air hose was one of those worthless quarter-fed vending machines which never work properly in the cold. It wouldn't put any air in, but it was happy to let more out as Sid tried to fill it. Thankfully there was a Valvoline Oil establishment next door with a real air pump inside, and they were nice enough to take care of the tires for us. Sid brought an extension cord over to plug in the opener and we were able to back the trailer into the garage for unloading. 130+ very heavy boxes of flooring!


7. Last week and this have been paint. Primer first, which got a late start because the paint store was out of primer. Only a day's delay though, and I noticed the big buckets of primer had a different brand label than the store we were told they used. Ceilings got a knock-down texture instead of popcorn. I am SO happy for that! Our interior color is pale grey, and I will do some accent walls myself. The first picture is the closest to the actual color. The other pics look much darker. And the light gives it a blueish tinge. I was hoping for no tinge at all, but if it's going to lean one way, I'm glad it's blue. 


8. Last up for this post, the cabinets got ordered, and countertops chosen. This is the countertops for the kitchen. 

And this is everything else. Clockwise from upper left- floors for bathrooms and mudroom, chip for downstairs bathroom countertop, tile for shower trim, shower walls panel, kitchen cabinets at the bottom, and flooring for the rest of the house. 


Not shown- counters for the pantry and laundry room. Those will be from standard stock at Menards because Sid can handle those with no problem. They will be a grey granite look due to limited choices. The bathroom cabinets will be white. We found them at Building Materials Outlet in Eagan. Three cabinet sections for $450! I need to order some filler strips from Menards for a perfect fit, but they will do the job.

So Exciting to watch all the details come together! Such a long journey and the end is now in sight.